
I'll begin with the best part, the before and after, then I'll break down how we did it:

Cute, right?? We love it.
So here's how it went - yesterday at about 2 in the afternoon, inspiration hit us, and we decided we needed to do the pallet wall now. I had collected a bunch of pallets before it started to snow, so we had a good stockpile in our workshop. I found them really easily, just driving through the industrial section of our city and picking them out of the trash.
So here's how it went - yesterday at about 2 in the afternoon, inspiration hit us, and we decided we needed to do the pallet wall now. I had collected a bunch of pallets before it started to snow, so we had a good stockpile in our workshop. I found them really easily, just driving through the industrial section of our city and picking them out of the trash.
The
first thing I'll mention is that there is a lot of people online who
are leery of using pallet wood in their homes, because of potential for
chemicals, etc. Apparently, boards that are stamped with HT are better
to use, because they have been heat treated, rather than chemically
treated. I had collected my boards months ago and was worried that I had
chosen the "wrong" kind of pallet wood. Luckily, every single one of my
pallets had the stamp:

In
terms of other precautions we took - the boards sat in sub zero
temperatures for months, which I'm hoping killed or slowed down anything
potentially damaging. I also sprayed the boards with bleach, which
hopefully killed anything else.
So
we started with the dismantling process. I've read a lot about this
online, and lots of people have mentioned that the process of prying the
boards apart can be very tedious and time consuming. Joel skipped this
part altogether, using a sawzall to slice the boards (and nails) apart.
Even though I'm sure this is faster than prying, it still took a long
time, and I got very bored, very fast.


Next, I pried off the baseboards from the wall we would be covering. Again, I chose my tool of choice, the butter knife. Let me take this time to say that the butter knife is a great multipurpose tool which can also be used to open paint cans and remove hardware from cabinets. Basically if it involves prying or twisting, I will almost always opt for the butter knife.

Next, I primed the walls for the wood by painting them a dark color. I found this color in the basement - the previous owners left it there after using it to paint almost every other surface in our house. I have spent the past few weeks trying desperately to cover up the dark grey in my living room, family room, and kitchen, and here I am pulling it out to paint basically the only wall they left untouched.


See? If those holes were showing white, it would be weird.
After all of that fun stuff, we began putting up the wood! A lot of pallet walls we have seen are adjacent to two other walls, so people just build them straight to the sides without framing them. Since our wall is open to the hallway, we used a couple of pieces of wood to frame it out, which we had seen on Cape 27 Blog. The wood we used on the right side wasn't necessary, but we did it just to match the left.

Following
that, we started hanging up the wood! There's no real "how to" for this
part - we just grabbed wood of the same width and attached it to the
wall, trying hard to not match up seams so that it looked effortlessly random (while actually requiring quite a bit of effort.)
Some
bloggers have suggested stacking your wood in same-width piles before
beginning, and honestly, if you are patient enough to do this, then you
should totally go for it. This is just historically not how Joel and I
do things. We both like to get things done quickly, and tend not to let
things like measuring and prepping get in our way. It all worked out
though, we were able to just pick the pieces as we went, rooting through
the piles to find pieces that looked nice together. We mixed darkness
of wood and length of wood, but we always consistently used the same
width of board for each row.


Soon we got to the *exciting* part of the night (meaning the one time during the project that anything other than choosing wood and nailing wood happened): the plugs! To start, Joel measured around them with a board, and cut out the appropriate shape to fit them through.


Next, he unscrewed the plugs themselves, and yanked them from the wall:

When he was done building the wood around them, he screwed them back in, this time to the pallet wood.

When he added the little switch plate back on, it looked totally normal. I've seen some people who have recessed their plugs back into the wall, and I'm not wild about the way that looks. I really prefer having the plugs over the wood, as if the wood was a regular wall.

After
the plugs, we were basically almost finished. After adding one more row
of wood, we just had to slice a few pieces down the center to make sure
the wall went right down to the floor.

And after that... we were done!!


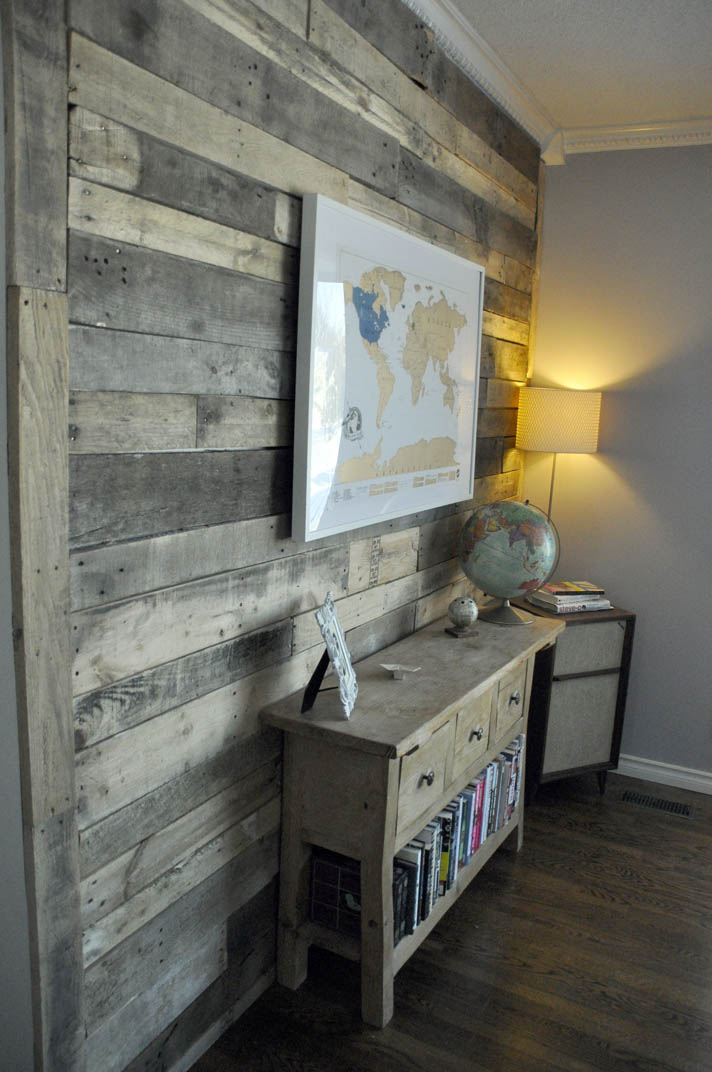
We
are so in love. Honestly, we are so, so proud of something that we made
together. I feel like after this project, we went from loving our house
to loving our house. We were able to finish this project in
about 6 hours, which includes everything from separating the wood from
the pallets to cleaning up our mess.
A few final notes from this project:
- Don't pay for pallets - I've read this before, and felt like this
had to be something only Americans were scoring for free, because in
Canada we never seem to get amazing deals like that. I called around and
was told by many stores, like Rona, Home Depot, and Home Hardware, that
they don't give away pallets. It wasn't until I drove down an
industrial road and saw piles of pallets in the garbage that I
understood, DO NOT pay for pallets! Trust me! I am a Canadian living the American dream!
- This project is surprisingly boring to do. Seriously. I was the wood-hander, so I literally spent about 5 hours of my night just handing my husband wood, having the wood get rejected for size or stain, and looking for more wood. I think it was equally as boring on his end - get handed wood, nail wood to wall, get handed wood, reject wood, nail wood to wall, for 5 hours. It's not fun. Luckily, it doesn't take too long.
- Paint your wall!! Can't stress this enough.
- See it through - about halfway through the project, I got a bit
worried about how the wall was going to "tie-in" with the rest of our
house. Our decor tends to be very pretty and light (lots of pale colors,
white accents) and I was scared that this wall was going to be a giant
dark monster in the room. I obviously got over this and we finished the
wall, at which point I realized that it was the most beautiful thing we
could possibly have made (I'm sure someday I'll say that when we have a
kid, but for now, the pallet wall is our baby).
- Resist the urge to stain your pallet wood - this is what makes it so special, and what truly makes it a zero dollar project. I had seen other pallet walls and was sure my wood wasn't "special" or "interesting" enough. Joel convinced me that if I didn't like the way it looked, we could stain the wall after, and I'm so glad that I didn't touch my wood. It makes the job so much easier, and it's way more fun to say that it's untouched pallet wood.
No comments:
Post a Comment